If you want to make your personal computer or laptop a web hosting server then you need internet connection through router or wifi. All your hosting data remain save in your computer itself. For that you have to install some softwares like XAMPP, WordPress etc. and configure them as per required. How to install xampp server, wordpress website and Filezilla FTP in windows 7/8/10 OS installed computer. Today i shall describe step by step procedure of XAMPP installation including troubleshootings. As per my opinion xampp is more powerful than wamp.
Installation and configuration of XAMPP, Wordpress, Filezilla - FTP in Windows Computer
What is XAMPP?
Xampp stands for cross platform – Apache, Mysql, PHP and perl. Filezilla and Tomcat included in xampp package. Apache use port 80 (http) and port 443 (https). Mysql use port 3306 and filezilla use port 21 (FTP). If you run a website in your computer locally (offline) apache and mysql primarily is required to start. If you start filezilla then port 21 will open and you can acceess FTP folders from your remote computer through internet.
How to install XAMPP?
XAMPP installation / Step – 1
Switch on your computer and start internet connection. From Apachefriends.org website download xampp software (Download Xampp as per your computer architecture such as Windows 32 bit or 64 bit) in your computer.
XAMPP installation / Step – 2
Now disable your antivirus if you have any antivirus installed in your computer. Disable windows firewall or defender firewall (you can enable antivirus and firewall after complete setup of xampp, but allow everything if any notice appear from antivirus or firewall app) . Run (Run as administrator,- right click on your downloaded xampp file and click Run as administrator) downloaded xampp software.
What ever instructions will come on your computer screen click on Next and finish your installation.
XAMPP installation / Step-3
After completion of installation go to desktop xampp icon or view xampp control panel from computer start icon (bottom left corner of computer screen). In xampp control panel start apache and start mysql. If it start successfully then port number 80 and 443 will show on apache and port number 3306 will show on mysql.
XAMPP Control Panel
XAMPP installation / Step-4
Now open your chrome or firefox browser. Type http://localhost, if apache dashboard page come/appear it means your xampp server installed successfully.
In your browser now type http://localhost/phpmyadmin
If phpmyadmin login page come it means mysql server also installed sucessfully.
Default phpmyadmin login user and password is-
User = root
Password = blank or nothing
You can create or add new user in phpmyadmin page.
phpMyAdmin in browser
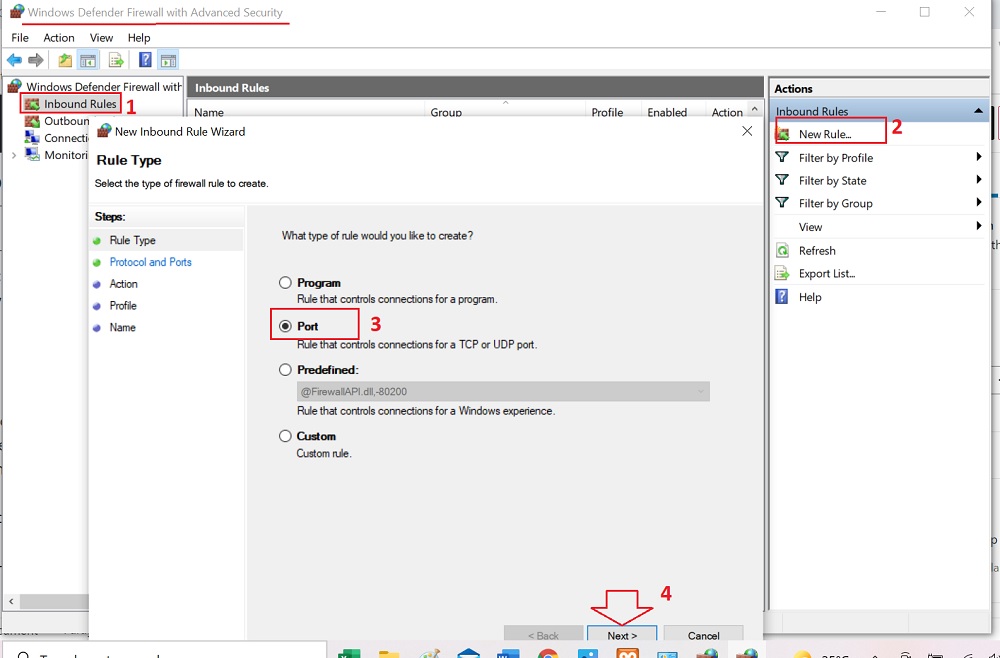
In the mean time you have to allow inbound traffic for port 80, 443 so that your webserver or website can be viewed in other computer uninterruptedly. For that you have to create Inbound rule in windows firewall advance security setting [ Open Windows Defender Firewall with Advanced Security from Start Menu in your computer]. You can allow other port number also using comma separated (specific port option = 80, 443, 3306, 21, 3000-10000 like this way, see picture below)
Create Inbound Rule for Ports
From above picture go to Next> then Select TCP, Specific Local ports (21, 80, 443, 3306, 5000-20000) – Next>Allow the connection. Next> All tick for Domain, Private, Private; Next> Give a name and Finish.
Note: If you type http://localhost in your browser > xampp Apache dashboard page come. Instead of localhost if you type your computer ip4 address (http://192.168.0.102) same xampp apache dashboard will come.
How to find your computer ip4 address?
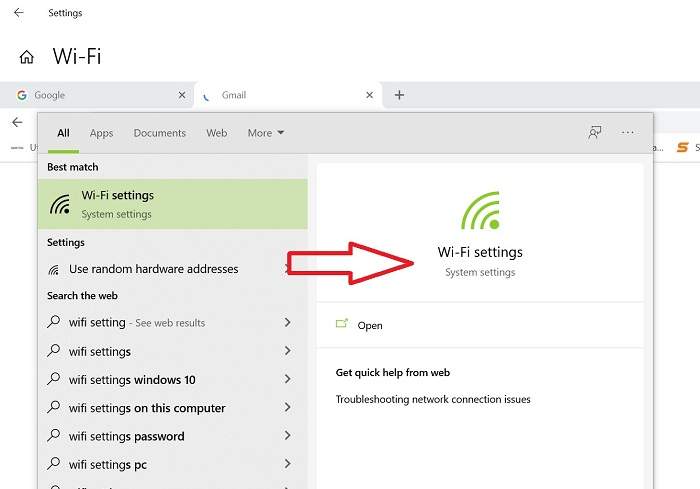
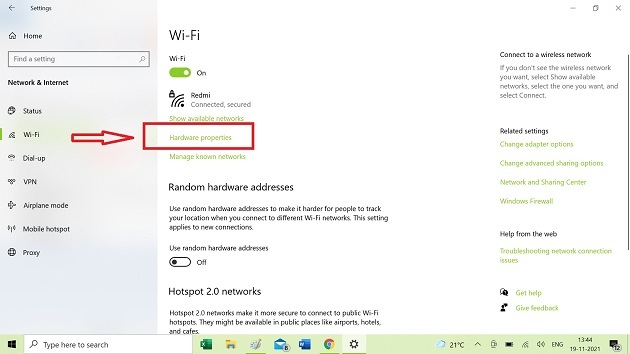
If you connected with wifi LAN, go to network & sharing in your computer, see connected wifi network, click hardware properties (see picture below)
1. Go to Wi-Fi setting from start menu
2. Select “Hardware Properties”
3. Your computer ip4 Address
Install WordPress website in your XAMPP Localhost server
WordPress installation / Step – 1
Now if you want to install wordpress in your local webserver or create a wordpress website then you have to download wordpress cms software (wordpress5.8.1 zip file) from wordpress.org website and save it in your computer D or E drive
WordPress installation / Step – 2
Create a folder and give a name of this folder (say ‘mywebsite‘ ) into htdocs folder [path is c:/xampp/htdocs]
WordPress installation / Step – 3
Unzip wordpress software file in mywebsite folder [Path C:\xampp\htdocs\mywebsite].
WordPress installation / Step – 4
For your wordpress installation you need a mysql database. So before wordpress installation create a database in PhpMyAdmin (http://192.162.0.102/phpmyadmin).
How to create database in phpmyadmin?
Open XAMPP Control Panel, see apache and mysql whether it is running or stopped. Keep it running.
Now Go to http://localhost/phpmyadmin or http://192.168.0.102/phpmyadmin [by default localhost server:127.0.0.1]
Login to phpMyAdmin
User = root [by default]
Password = blank or nothing [by default]
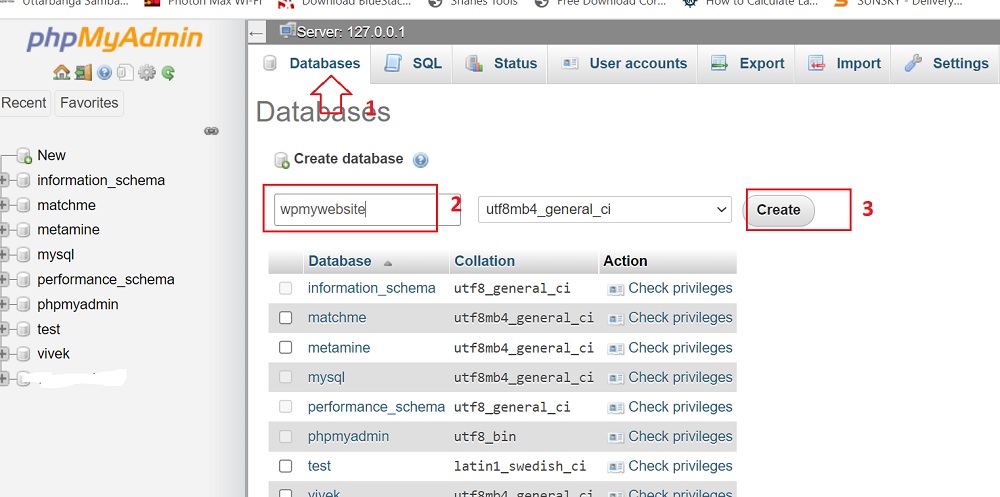
Enter into phpmyadmin and click on Databases > create new database > give a name of database > Create (say- wpmywebsite -name of new database)
Create new database in phpMyAdmin
WordPress installation / Step-5
Now go to your mywebsite folder in C:\xampp\htdocs\ , directory. You will see wordpress folders such as wp-admin, wp-content, wp-includes and so many php files including wp-config-sample.php file.
Rename the wp-config-sample.php file to wp-config.php file. You can create duplicate copy of wp-config-sample.php file, one keep unchanged another rename to wp-config.php file.
OR ————
You don’t need to rename wp-config-sample.php file manually, you just fill required informations during wordpress installation from browser using url http://localhost/mywebsite or http://192.168.0.102/mywebsite
WordPress installation / Step – 6
If you rename wp-config-sample.php file—then follow below steps
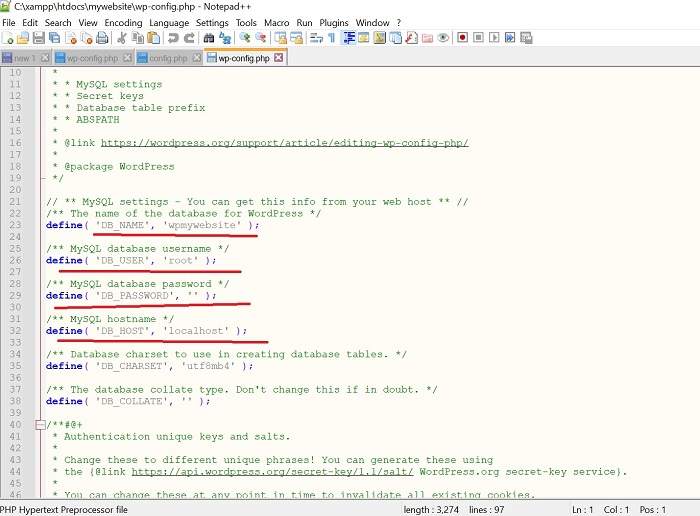
Open your wp-config.php file in Notepad or Notepad++. See the lines define database name, mysql database username, mysql database password and mysql hostname
Database Name = wpmywebsite
Mysql Username = root
Mysql Password = blank or nothing
Mysql Hostname = localhost (by default it is localhost itself)
Edit wp-config.php file before WordPress installation
WordPress installation / Step – 7
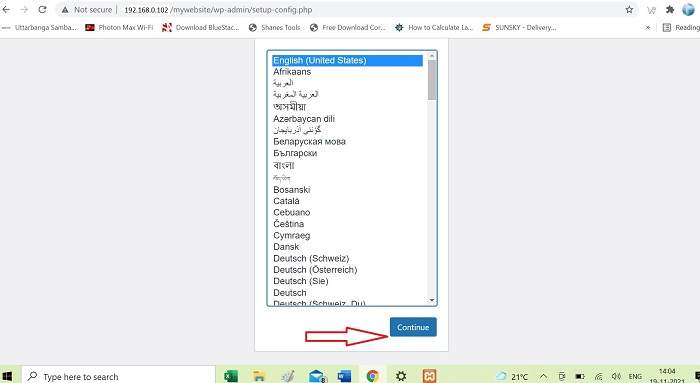
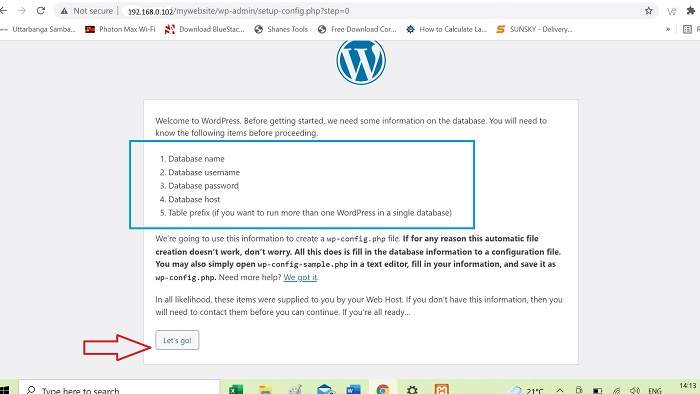
Now open your chrome browser. Type http://localhost/mywebsite/ or http://192.168.0.102/mywebsite
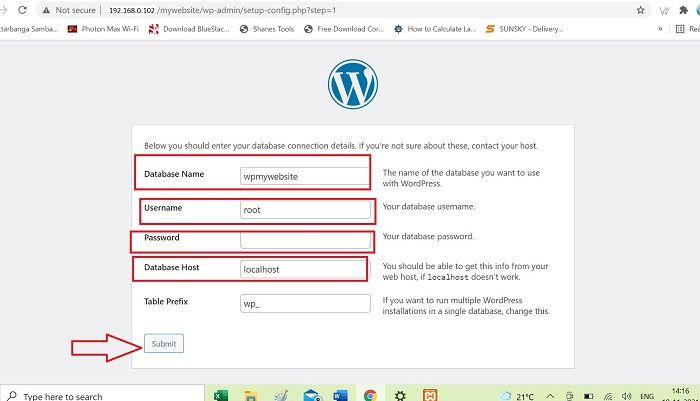
You will get wordpress installation step. Just fill your data. [Note: if you configure wp-config.php file manually before installation process you will not get this step. If you do not configure wp-config.php file manually then you will get this step during wordpress installation]
Fill database name = wpmywebsite
Username = root
Password = blank or nothing
Hostname = localhost
Submit it then…..
wordpress Installation/ Ist step
wordpress Installation/ 2nd step
wordpress Installation/ 3rd step
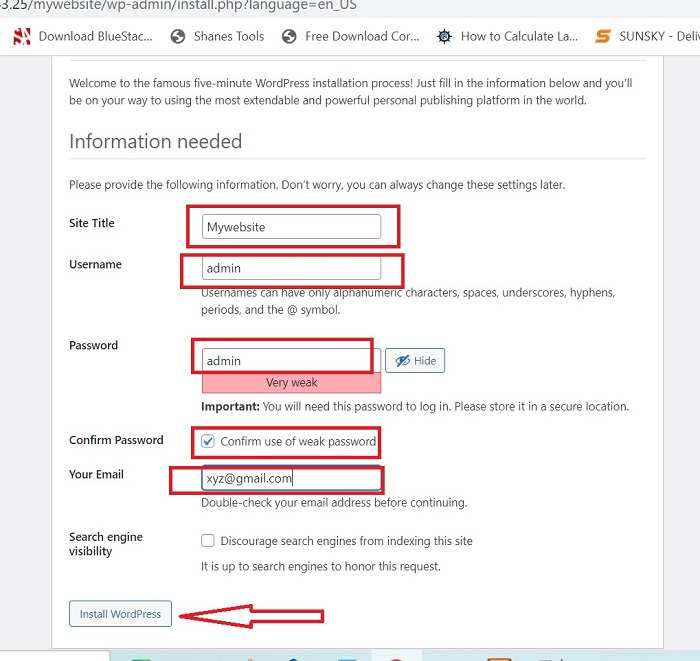
Put username and password for your wordpress website. Such as –
Username = admin
Password = admin
Tick on confirm is of weak password
Put email id
wordpress Installation/ Final step
Install-–it will take some few seconds and finally Success message will appear directing towards Login Page.
Install wordpress website and redirect to page WP -Admin login page (http://localhost/mywebsite/wp-login.php)
Put your WordPress -Admin username (admin) and password (admin) created above.
Go to your wordpress Admin dashboard.
Note: if you put your url using ip4 address of your wifi LAN connected computer – such as
http://192.168.0.102/mywebsite/ your website will open in your computer only. But other computer (say your office colleague computer) in same wifi LAN network website will not open fully or properly. For that you have to define certain rules/lines in your wp-config.php file
Open your wp-config.php file [Path C:\xampp\htdocs\mywebsite].
See the lines….
/* Add any custom values between this line and the “stop editing” line. */
/* That’s all, stop editing! Happy publishing. */
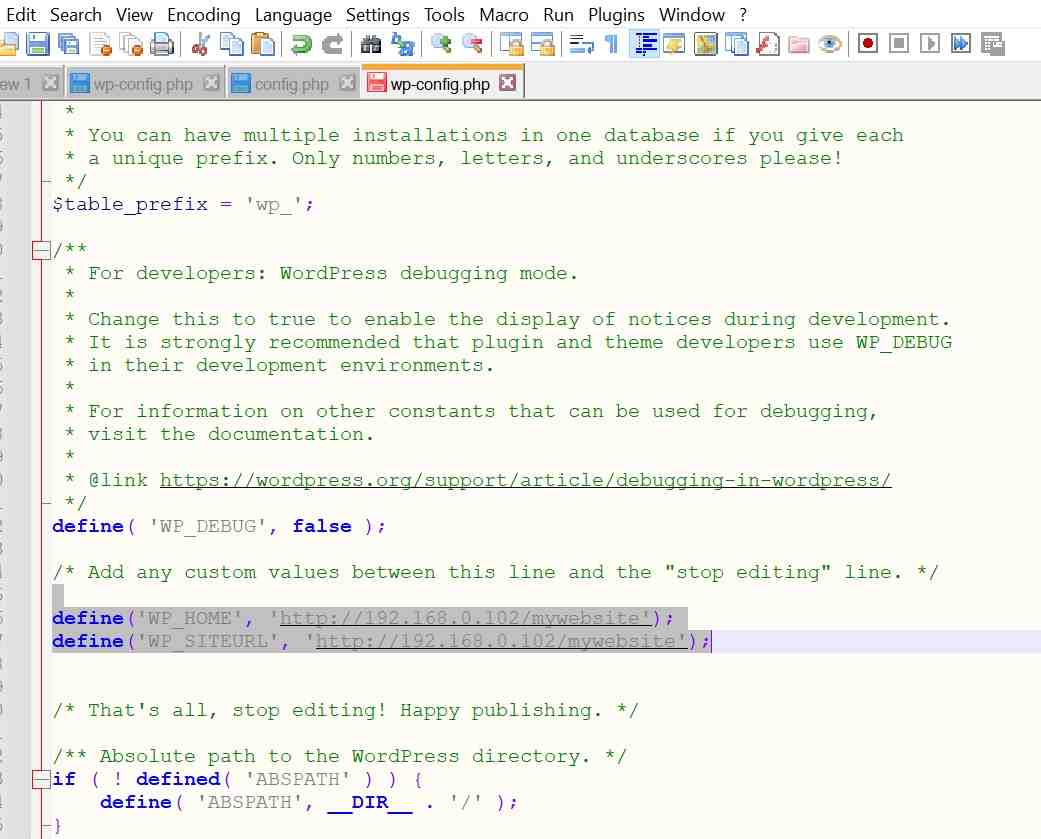
Put below lines in between above two lines such /* Add any custom….…”stop editing” line. */ and /* That’s all, …..Happy publishing. */
define(‘WP_HOME’, ‘http://192.168.0.102/mywebsite’);
define(‘WP_SITEURL’, ‘http://192.168.0.102/mywebsite’);
see picture..below
define Rule in wp-config.php file
Note: In wifi LAN network every time ip4 address automatically change whenever you will start your PC. So, each time your wp-config.php define lines have to be changed. You can make it static ip for your laptop or computer in Router/wifi setting. Otherwise, website will not be rendered completely in other network computer. In your PC also problem may face problem.
If you face issue even after completing wp-config.php define lines and all setup right way. Then one solution is –
1. Clear your internet browser cache
2. Open command prompt (Run as administrator) and type [ipconfig flush/dns]
Again try to open your wordpress website…
Edit some Apache files httpd-vhost
[Require Local >change it to Require all granted]
Setup FTP server (Filezilla server 127.0.01) - in XAMPP, local computer
Suppose you are running webserver from your computer. Sit on your office colleague computer (connected with wifi LAN) and try to opening your newly created wordpress website (http://192.168.0.102/mywebsite). Your website opened successfully, using your admin dashboard creating/publishing new post or page. But you want to access all wordpress file or any other file from your own server computer. How it is possible? For that filezilla will work.
Filezilla server / Step-1
Go to your own server computer start Filezilla from Apache control panel.
Filezilla server / Step-2
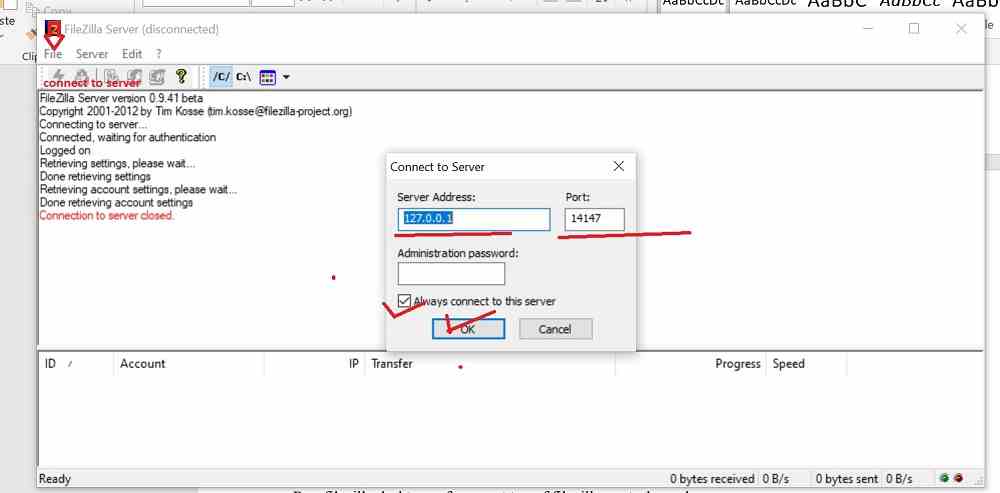
Go to Admin button of filezilla. An window will open, go to File>Connect server; another window will open (see picture). Server address: 127.0.0.1 and Port: 14147 (by default). Leave them as such, You may put Administrator password, Tick Always connect to this server option. Click OK. Now you will see the window message “Connected, waiting for authentication” “Logged on”.
Filezilla server / Step-3
Now click on Edit>Users, a window will open. Add user (put username and password if you want). Then Add Shared folder (see picture). Whatever folder you wish to share from your webhost computer.
Add Username & Password// Add File //to share on Filezilla server
Now download filezilla client software (Dont confuse with filezilla server software and filezilla client software, they are different. Xampp having filezilla server software installed). After downloading (before downloading check software whether it is for Windows or linux or Mac, whether is is for Windows 32 bit or 64 bit ) filezilla client software install it in your computer.
Run filezilla client software, at top of filezilla control panel Put hostname, username, Password and port number (see picture)
Hostname = ftp://162.168.0.102 (in your own computer you may put localhost)
Username = what you have given during add username setting in filezilla server setting
Password = what you have given
Port = 21
You will see the folder and sub folders what you have added during Filezilla server configuration setting.
If you try it from your office colleague computer (connected with same wifi LAN) you will see folders and all sub folders. Before that you have to install Filezilla client software in your colleague’s computer.
View your newly published website from another City through internet connection
Now you can open your website in your computer as well as other computers connected with home network or wifi LAN network. If your friend want to view your website from other city or country how it is possible. For that you have to do some other settings and use of some other tools.
Most common tools are –
1. Ngrok
2. Packetriot
3. Localtunnel
No need wifi router special settings, you sould have internet connection only through mobile hotspot or router wifi connection.
NGROK Tool
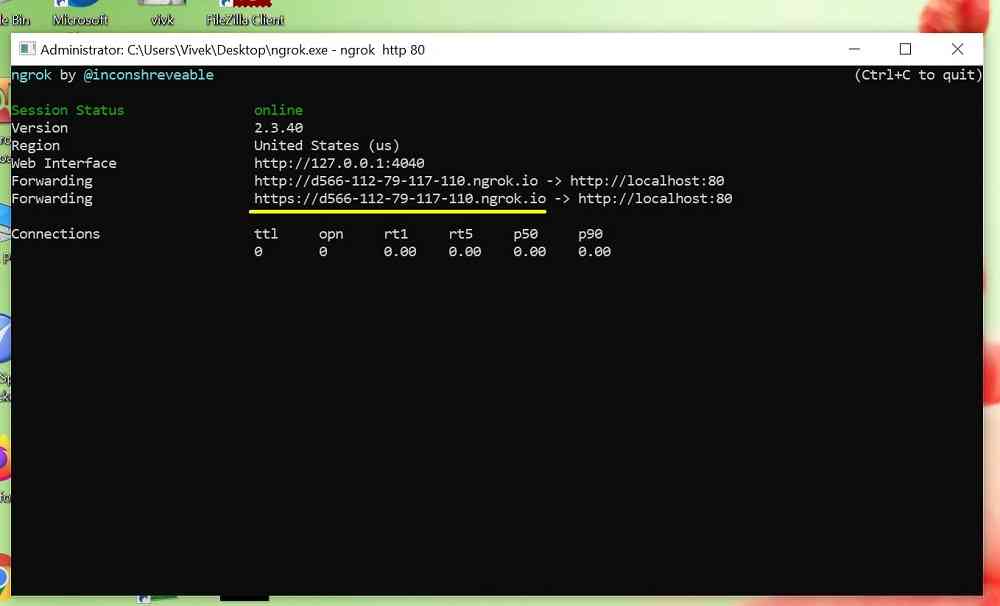
Download ngrok software zip file as per your operating system, unzip it. Start Apache and Mysql from XAMPP Control Panel. Now run ngrok.exe file (Run as Administrator). You will get command prompt window. Type ngrok http 80 .(see picture) you will get two random urls one http:// another https://. Copy any one url (say – https://d566-112-79-117-110.ngrok.io) and paste in your browser. You will see your Apache dashboard page. Now if you want to view your Mywebsite WordPress website using ngrok url you have to change define rule/line in wordpress wp-config.php file like-
define(‘WP_HOME’, ‘http:// d566-112-79-117-110.ngrok.io/mywebsite’);
define(‘WP_SITEURL’, ‘http:// d566-112-79-117-110.ngrok.io/mywebsite’);
Each time you stop and run ngrok.exe file you will get new url in command prompt window. And each time you have to configure wp-config.php file.
Packetriot Tool
In case of Packetriot you have no issue of url changing but you have to create an account in packetriot website. You have to download pktriot-0.12.2.win32.zip or pktriot-0.12.2.win64.zip file from the website. There are so many steps to run the .exe file in Command Prompt or Windows Powershell. For details you can see this video.
Localtunnel
Localtunnel is more suitable for Linux operating system. For details you may go to link here
As per my opinion NGROK is comparatively better for url forwarding. It is user friendly and hassle free, no need account.
Some other tools in which router settings required (if routers allow these settings or have that features)
1. No-ip
2. DynDNS
If your router allows Port forwarding, NAT settings, dynamic DNS setting you may go for No-ip or DynDNS account settings. You have to create account in No-ip website, you can use custom domain of your choice. There are both free as well as paid service available.
Problem after first installation and Solution
Problem:1. You are creating post/page in your newly installed mywebsite website. Uploading an image of 4-5MB size in your post, but getting error message without uploading. What is reason?
Solution: By default Apache having max 2MB upload permission. To overcome this issue you have to edit php.ini file. Just find below lines in php.ini [Path C:\xampp\php] file. You may click on Apache ‘Config’ button from XAMPP control panel window.
###
Maximum size of POST data that PHP will accept.
; Its value may be 0 to disable the limit. It is ignored if POST data reading
; is disabled through enable_post_data_reading.
; http://php.net/post-max-size
post_max_size=8M //{change value as your choice, say 1000M}
###
; Maximum allowed size for uploaded files.
; http://php.net/upload-max-filesize
upload_max_filesize=2M //{ change value as your choice, say 1000M }
###
; Maximum number of files that can be uploaded via a single request
max_file_uploads=20 //{ change value as your choice, say 100 }
Problem:2. Sometimes WordPress pages do not open in my colleague’s computer connected with same wifi LAN although all settings are ok.
Solution: Open Apache httpd.conf file [Path C:\xampp\apache\conf]. You can get file directly from XAMPP Control Panel>Config. In that file you see many lines like —
# Controls who can get stuff from this server.
#
“Require Local”
***You just change the line as “Require all granted”
SMTP Email setting in WordPress (Localhost) website
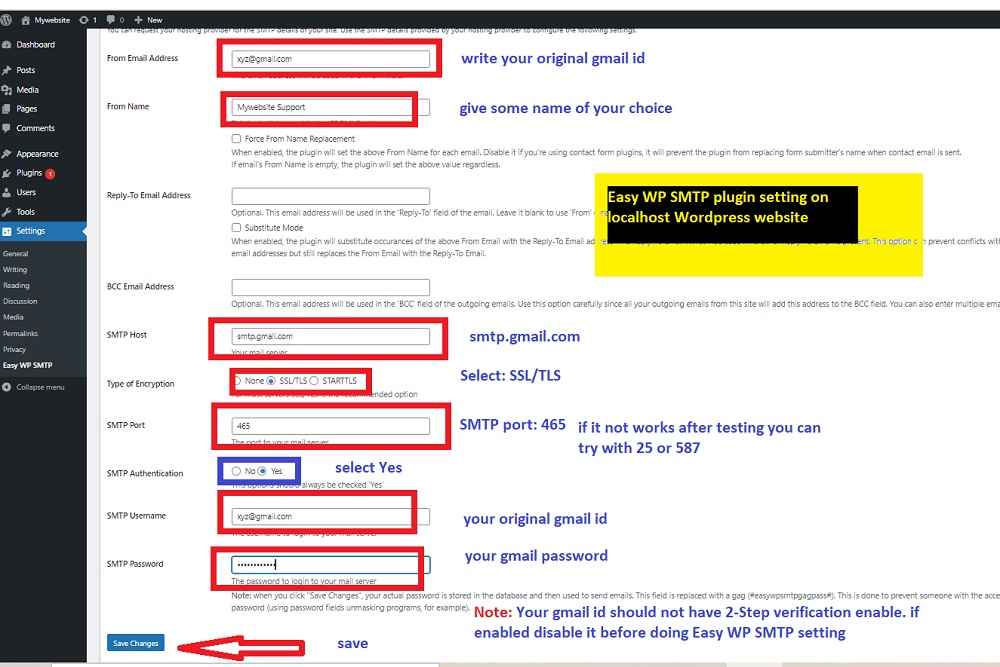
In localhost server newly installed wordpress website don’t have email setting, PHP mailer sometimes don’t work. You can add SMTP setting to get email message during WP Admin/user password change, You can send mail to your friend via your newly installed wordpress website at localhost server. To add SMTP setting you have to install plugin WP Mail SMTP or Easy WP SMTP. I am showing here settings of Easy WP SMTP plugin. Go to your wordpress Admin dashboard after login, add new plugin, search for easy wp smtp plugin, install and activate it. Now do setting for Easy WP SMTP. [Note: Before set up your gmail id account need to be checked whether 2-Step verification enabled or not. If 2-Step verification is enabled it has to be disabled first. Go to Link]
Easy WP SMTP settings
Fill below settings in Easy WP SMTP
From email address: your gmail id
From name: your website name or your name whatever you want
SMTP Host: smtp.gmail.com
Type of Encryption: Select SSL/TLS
SMTP Port: 465 [if not work, you can try with 587 or 25. It will work definitely]
SMTP Authentication: Yes
SMTP Username: Your Gmail id
SMTP Password: Your Gmail password
After filling all these data SAVE changes and Test mail
Enable SSL in localhost website [http:// and https://]
Whenever we open our newly installed website it opens through url http://localhost or http://192.168.0.102 . If we try to open https://localhost it will not work. To open with https:// we have to do some settings in XAMPP server. There are several steps to enable https://.
- Certificate creation
- Apache configuration to access https:// instead of http://
- Configure mod rewrite to generate SSL url
- Configure Virtual host to test site
You can get detailed information from this link
--------------------
©VSarkar


